Quantcast
Channel: MASSIVE VOODOO
Viewing all 2385 articles
Browse latest View live

Beautiful Jessica

$
0
0
Hi, 

Jessica, a beautiful name, eh?
Well, Jessica turned into a Zombie and now she ain't that pretty anymore.


I found Darkworld Creations' Jessica bust while I was searching for some Zombiebusts and sculpts for a hobby friend. I found a video of the 3d sculpt and really... well, fell in love with that Zombie Jessica.

She reminded me of the Zombie conversion I once did with Satin - check the article here! I picked up the search machines once again and found Jessica at Darkworld Creations. Compared to other 1/10 busts this lady here comes really tiny. The describtion from the page says: "This 1/10 scale bust is 54mm in height and 33mm at the shoulders. The head is 22mm in height and 16mm wide. This bust is cast in detailed resin." 

Well, all in all I did enjoy her size a lot and had mucho fun painting her in colours I do not use so often. You will find a step by step about this lady sooner or later in your massive jungle :)


 Jessica
Darkworld Creations, 1/10

"God's spine is broken and he left humanity behind in the midst of a virus that feeds on the living." 


Last photo as usual shows her in comparision to her fellows in my cabinet, this time the photo was done just with the big camera, no lightning used, so it is a little bit yellowish.


Hope you like ehrm ... beautiful Jessica!
Keep on happy painting!
Best Wishes,
Roman

Hhhoooouuuwwwllll!!!

$
0
0
Wolves everywhere ... 

Done for a 30's birthday gift to our friend Wolfgang from Vienna: A personalized brushbox, painted with a little love from Raffa and Roman. Guess what, Wolgang likes wolves:


And even Sanne had a painting spree on canvas with a wolf included - WIP ...


Happy Painting to you too, Jungle Painters!

MV-Team: Roman

$
0
0


Name: Roman Lappat

Nickname: jarhead

Job: self-employed Artist since 2008 and passionate teacher, founder of Massive Voodoo, pulling strings in the back of your jungle blog and very often the horse power behind daily updates to MV.

Years of Painting: 2006~now if just painting Miniatures, means about 9 years by now.
Went to school and studied painting and Arts all along and do drawing or painting it since I can think.

Media: Acrylics, oils, water colours, inks, coffee, etc.

Brushes: Windsor&Newton Series 7 (standard, not miniature), size 0, 1 and 2. These are my main brushes but I have all sorts of brushes for different tasks, sometimes I use also my fingers to paint.

Airbrush: Yes, it’s a great tool, like a brush, only with air, but I do not enjoy the cleaning of it. Pfft!

Miniatures: Fantasy and Historical, all common scales, from 1:100, 1:72, 28 mm to 90 mm, not yet bigger.

Speed: Usually fast, depending on the size project slow is also an option.

Average Painting Hours per day: 6~8 h +, but sometimes more, depending on the muse

Sculpting: Not very consistent efforts here, but skills are slowly growing. Need to put more time into it.

Favourite Miniature Painters: everyone who takes a brush, some colours to sit down with and spents his time with painting a small figure, plane, tank, car, ship, train, diorama, etc. and finds joy in it.

Favourite Miniature Sculptors: Allan Carrasco, Pedro Fernandez, Romain van den Bogeart, Raffaele Picca and many, many more, but mainly those again who take their bravery and are ready to learn and study the magic of it. One day I'll find the proper time too!

Gallerys of my miniature works:

Putty&Paint
CoolMiniorNot


Aloa, 

my name is Roman.
I currently live Augsburg, Germany, my hometown, working self-employed as a Miniature Painter since several years. I always loved colour and ever since I can think I draw and paint on all surfaces available to me.

Many miniatures have seen my brush dancing some colour choices on them and I did a lot of projects, comissions and fun models in the past. I do not count them anymore, but I do enjoy every new or old project under my nose while I am working on it, but after it is finished, I quickly lose interest on it. I am not sure if this is good, but I have learned that I am open for new ideas faster again and am able to sell some of my pieces more easily to make a living as a self employed artist.


"Every artist dips his brush in his own soul, and paints his own nature into his pictures."
Henry Ward Beecher


After I did my vocational diploma in art and started with focusing my creative energies on Miniature Painting in late 2006, I decided to be self-employed with painting armies on commission beside my studies. Painting armies and units really helped me to learn a lot about the techniques of miniature painting and I found my own way of painting them with a count of approximatly 300 finished models a year in the first three years of my self employment. Learning can only come if you do something often and with fun.

I studied to become a teacher for art, art-history, technical drawing, was trained in carpenter skills, text processing and multimedia. After I finished my first state examination as a teacher I should have done the second one and become a teacher for the state of Bavaria, but I did not take that road of security. I decide to walk an insecure path instead and go on with what I love: Painting Miniatures. Since 2008 I am self-employed without university distracting me from my work and passion.

A passion that I found during university was also teaching. I combined my passion of miniature painting with the teaching of classes related to miniature painting. I never did regret this decision so far, even sometimes this path took and still takes me through dark valleys of uncertainty once in a while.

"No one knows what he can do until he tries."
Publilius Syrus


In the past years I was able to meet so many kind people, made friends worldwide and was able to spread the word about happy miniature painting in many hearts. This is where my passion finds its fuel. Seeing the glow in someones eyes if the passion is truly fun makes me happy. Knowing that in some painters cases I helped a little is my major award why I am doing what I do as my job.

I am happy to have met the friends I have in life, including the whole gang of good people of the MV Team, which I count to my closests. I am in two happy relationships: One with my great girlfriend Anna and the other one with my BiBaB (Brother in Brain and Brushes), Raffa, with whom I share this passionate way of life, our studio in Augsburg, visions, being direct neighbours and many other things.


What I enjoy most about the Miniature Painting Community is the people that have this big love to miniatures in their heart. No matter what job everybody got, no matter what social background, no matter what the looks of some are - people are who they are: A big family with everyone equal where everybody enjoys to paint Miniatures and this is a great thing in a world that often stamps people from their social perspective too quick.

In my eyes everyone is equal, no matter what he does, no matter how big his experience in something is, no matter how much money he got or how cool or chichi he/she pretends to be on the first impression. I learned to not judge people to quick and realised that it is good to see the person behind their behavior with a little patience. I found this freedom expressivly lived in the Miniature Painting Community and I try my best to give back as an artist and teacher to this community by spreading the word about happy painting of miniatures and frankly by all means possible to me as a person. Making this beautiful passion grow is important to me as the community sorrounding it is still small and this magnificent hobby still to unknown to many.


Is Miniature Painting a form of art?
I can not answer you that, as the meaning of art can only be found in oneself as is the meaning and purpose of everything else. I, personally can not go in a Museum and say this is Art or this is not. In my eyes no one is able of telling others so as the process of construeing Art is happening in oneself - if it is its creation or its reckoning. My oppinion.

"Art is the most intense mode of individualism that the world has known."
Oscar Wilde


Well, what else? 
I like to play Basketball, read way too many books, love to listen to all kind of music, love to draw and paint small or big paintings or drawings once in a while, don't watch television anymore since eleven years, love to ride my bike, love to take photos, play computer games once in a while, have a great girlfriend and a beautiful relationship, two awesome cats, great friends, great family and I am happy that learning never stops in all aspects of life. I enjoy to do stupid things alone, but rather with friends. Do stupid things sometimes, they always create good memories.

In my dreams there are no cars on this planet and I find myself on horseback as a warrior who fights against injustice. In my dreams. Well, did I mention that I like Batman a lot? Dreams are dreams but if you look close inside yourself, while you are doing decisions or judge about a situation of life you can find your Batman there. There is one in every person and it is your choices, thoughts and words in life that can bring him alive. I try not to hang my head in sorrow - even I am a deep thinker often - but I am a positive thinking person and frankly can not remember the day when I was really, really sad the bottom of my heart.


Happy Painting to all of you!

MV's Jar's Basing Class ahead - One final seat free again!

Male Galaxy Defender

$
0
0
Good Monday Morning jungle,

time again for another finished paintjob. This time I am able to show you one of my latest ones: The Male Galaxy Defender by North Star Models. You can find a Miniatures Unpacked of it here.


"You can fight like a Krogan, run like a leopard, but you can't be better than Commander Shepard... "

As a big fan of the Mass Effect series I was in need to paint that one up too. I already did the female version of it and had a lot of painting fun with both.


Male Galaxy Defender
North Star Models, 54 mm


Hope you like him?
Keep on happy painting!
Best Wishes
Roman

PS: Besides, both of the Galaxy Defenders are on Sale in the MV Boutique, have a look to make these unique paintjobs of these models yours:

Mu 60/Tutorial - Scale75 Metal and Alchemy Steel Series + Inktensity

$
0
0


Good Morning Jungle Painters,

it's about time to bring up your choice from last weeks tutorial voting. Most of you voted for a closer look on Scale75 Metal colours. The MV-Team are using the Scale75's for a while now and Raffa and Roman will now bring you some thoughts about these high praised colours.

This article is mainly about the Scale75 Metal and Alchemy Steel Set, but also takes a little look on the Inkensity Set in the end of the write up. You can also spot the Flesh Paint Set in some photos, but this will be a different article one day as more tests are to be done.

This article is a bit a Material Unpacked as far as you can unpack colours without a big mess and gives tutorial guides here and there. Article is written by Roman, but thoughts of Raffa and him are to be found in this article.

Enjoy!
______________________________________________________________________________


Okay, let's get it on with the article. I told you I'd explain the colours on the recent model I have painted from Terrible Kids Stuff and I will do, but later on. First things first and I think it is important to look at the colours first.

I had my first encounter with the Scale75 metal colours back on my painting class in Blumberg-Achdorf, but before I dig deeper in my first expression let's say that the jungle is doing mucho experiments with metal colours as you can see in Raffa's article:

Metallic Colour Comparision Chart
A collection of the results by different metal colour brands! Huge!

Unfortanetely the Scale75 colours were published a good while after this article, so you won't find them on that colour chart, but I think you get the point I'd like to explain: We are no noobies when it comes to metal colours.

Ok, back to Blumberg-class where I did put a drop of the Scale 75's Black Metal on my wetpalette for the first time to test them right in the class. If you do not want to feel like an idiot in front of a full class prepare a toothpick as these colours will be delivered sealed and you have to break them open with your tool of choice.

My first impression was: Well, I'd call it a colour orgasm. From the first look on I was in love with this metal tone, its high number of fine pigments and its brilliance.

Pfffrrddd!

Since then we are doing tests and use them more frequently in the jungle HQ as we really like these colours. The metal tones are great and really well chosen, as a painter who paints eight hours a day since years I can say that you really feel that these colours have been developed with great thoughts and painting wisdom by the choice of the tones you find in the set (sorry, forgot the purple Alchemy in the photo!!):


The basic metal tones from left Black Metal to Speed Metal work really well if you work your true metallic metals from dark to bright. The White Alchemy is great for some shiny dots or edge highlights while you can use the Alchemy metal tones to bring some colour play in your metals.

An introduction into the theme of painting with real metal colours.
 

... but there is one big problem all Scale75 colours have: Their mix. It does not matter if it is the metal set or the skin or leather set. Their mix provides the colours - beside the metals - with a really matte finish when painted. And often if you used them not daily these Scale75 colours change in their bottles. The pigments descent to the bottom of the bottle while their binder is staying up, often all colour by Scale75 look like this:


This colour is in no state to paint with it as it is not mixed properly. Now it is shaking time and I wished that Scale75 thought about this problem and would have added Agigator Metal balls to their bottles for example those by PK-Pro. There are non and so shaking becomes a hard task to get these colours ready.

Raffa went straight forward and used the drill machine with a bend wire piece for this task:


Open carefully ... sorry, for the blurry focus:

 Dsccchhhhh!!!


Following you can see how a proper mixed Scale75 colour should look like (middle) compared to an umixed one (left):

Well, this is truely annoying, but unavoidable, if you want to use these colours right and with the power they got. We used some of the steel set and some of the gold set for example for the awards of the Forged Hope Program.


Well, ok. The matte dry some of the regular sets have is great as the colours really dry beautifully matte on your model and it is great to work on top of them. A quick jump away from the metals to show you another problem you might encounter with all paint sets by Scale75 (which also appears with the metal tones btw): They dry fast, even if you put them on your wetpalette. This comes from their mixture again. Something in it, that makes them so matte makes them fade away in about three hours on your palette and there is only dusty dry colour left:


This problem is solved easily: Paint them :)

And that is what we do right away. Let's have a look back on the metals. Black Metal is Roman's favourite colour, why? It is a great start for metals, dark and so fine pigmented that it leaves a great surfaces to work on top of it - have a look at this early WIP to see the effect Black Metal has on black prepared armour parts:


Now adding a little bit of Heavy Metal to it to get these first light situtation sketches up to the your basic metal tone:


Well, really cool for some minutes of work. Now let's head over to the "Vampire guy" from Terrible Kids Stuff. The base was build rather simple with the provided resin part and some wood parts I broke out of the plinth.


After this the model was primed grey with Vallejoy primer as there was no black one at hand - I prepared the head for painting on its own - why? You will see in the next step:


As that guy is full of armour I decided to spray some Heavy Metal on top of him with my airbrush. The Scale75 colours are thinned well with Scale75 thinner and so I did in my airbrush - everything silver now!!!!


Next was cleaning the airbrush properly and heading for black metal to spray shadows with it to the model - still looks like a silver trophy!


Next I decided to test the Inktensity black in my - again - cleaned airbrush. Make sure to really clean your gun well if you spray metal tones. And wow, first impression on the Inktensity Colours are: Damn, they are intense!! Have to take more care or thin them more...


I now went for some Vallejo Colours to bring in a little bit seperation in the project before I worked further. Fabric, base, skin and leather parts recieved their basic colours:


Now I went for the Inktensity again with the brush to give the metals interesting tones, really testing the Inks was my goal here and well, yeah they have power. If you want to achieve gentle effects with them use them thinned down with water properly. I did not in the initial start of my tests, but learned from it ...


I had to rework some of the metals again where the inks took too much focus, for example his leg armour:


Last steps included an overall general clean up, detail work and some blood splatters. It is definatly fun to work with the metal steel set and the Inketensity Set. Highly recommended if you avoid awkward painting moments by mixing them properly before use.


Let us know your experiences with the Scale75 colours?
Your thoughts on our explanations here?

Keep on happy painting!
Best Wishes
Roman and Raffa


Musica

Step by Step - Male Galaxy Defender

$
0
0

Good Morning Jungle,

this week is a bit special as there are two articles up for you due past MV's year of the painter's special Birthday Tutorial Voting Edition (wow, what a describtion). Six articles have been up for your vote and MV decided to bring you two articles from it.

We hope this is a good thing and there is another change of plan on the horizon. The so called "SciFi base" on Northstar Models Male Galaxy Defender will not only take you on a trip through the basework, but will also bring you a walk through Roman's painting process.

We hope you enjoy!

_____________________________________________________________________________

FOREWORD
As a true Mass Effect fan I one day had to paint the Male Galaxy Defender by Northstar Models in 54mm. I could not skipped that one, after I have done the female version already.


On a day while the sky was burning and the galaxy was aflame I started this model just beside some other projects. Call it preparation and a simple start, but unfortanetly I did not worked further on him after this initial start.

A very bright greyish/blueish armour, a brown face and a simple base build on top of a beautiful unique wood plinth by Sockelmacher.de and a little orange/brown/yellow colour sketch to the base. I did not went further for about a year.


PAINTING PROCESS
Usually my inspiration and muse plays tricks on me and I often thought about this model in my WIP cabinet. My guess was, if I one day play Mass Effect again or get in contact with it I finish him up due the sucked up inspiration. It did not happen at all, but one day without a proper inspirational butt kick I sat down and tasked myself with finishing him up.

I searched the endless Internet for some inspiration and printed them to take them to my workplace. I don't like to sit down with my smartphone or tablet (that I do not have) while I paint. I look in such daily life tools too often and painting needs no combination of this multimedial thing, at least in my oppinion. I still read books as I like them better than ebooks, see?


I quickly realized that there is work ahead.
First thing I did was using my airbrush to spray that bright blueish armour darker with some thinned Scale75 Inktensity black. After this I used some VMC grey, London Grey (very neutral grey) to spray from above on the models armour, added a drop of VMC Ivory and a drop of GW's ice blue in that airbrush mix and gave the first sprayed highlights a more cold appeareance. Sorry for the lack of photos in this step.

 For the next steps we have photo results. I took some more of the Ivory to the mix and took the brush to glaze my way into stronger, brighter areas on the armour. Adding more of the Ivory to it I also head for the edge highlights on that armour alreay with a first sketch.

The face recieved a basic tone with gentle lights while I did my first experiments with the Scale75 Skin Set. The weapon recieved a basic tone with some sandish VMC tone and also some gentle brighter areas by addition of a tiny drop of Ivory. I used some yellow/sand/orange colour drops on that base to mix them together in there, just to find my direction. His, well yeah "hair" have been painted with a basic tone of London Grey but with a little tourquise in it to keep it cool. You might also recognize the little purple touch in that armour's shadows. Well, Inktensity again, but really well thinned 1/20 (colour/water) and gently sprayed from a low angle into that armour sketch. You can see it everywhere if you look close: armour, face, weapon, base, etc. ...

Why purple? I have no idea ...

Next step was working on stronger edge highlights and shiny armour dots here and there. I did so by using more and more Ivory in my armour colour mix and some of those white dots have been done with pure Ivory. I do enjoy paint these when it comes to such models. The Artwork in the back really helped me a lot for inspiration on how the light falls and spreads on that armour and on helped me how I wanted to tackle the armour too. The Computer Game Mass Effect Series has a special look (light, shadow, materials, athmosphere) on it and I am looking forward to one day play Mass Effect 4.

I used some pigments on the base, but I'll tell you later on the basework itself. Just check that I gently used these pigments also on the armour of the lower body parts. A little reflecting light from the groundwork to the armour going on.


During the next steps I took care of the weapons damage by using a dark brown mixed from VMC Chocolate Brown and black and did some initial weathering to the weapon. Again, the artwork helped me here to guide me as an inspiration.

The amour recieved its "warpaint" by first creating a very bright line to his right arm with a mix from Ivory and a tiny drop of ice blue in it. With the same colour I went for making stronger highlights here and there at the armour once again. Now I used some Army Painter Dragon Red for to add the red stripe on the "warpaint". After this I took the first Ivory/ice blue tone again and added scratches and ripped of colour to the red part of the "warpaint". The "N7" logo has also been painted with these colours.


During the next step I masked his face and sprayed a thinned mix of blue and black Inktensity by Scale75 to the whole armour to bring it all together and make it look more as one. Via Airbrush.


I repeated the steps of highlighting the armour with bright greyish Ivory (brushwork) and again after this step took the airbrush with thinned Sclae75 Inktensity black and used it on the lower parts of the armour.


Sprayed some gentle very thinned blue on top of the whole model as I really wanted to catch the athmosphere of the artwork. Painted a some more stronger highlights on the basic skintones and with his scar on his hair slowly found the character I was aiming at. Slowly. Before I went further on the model it is time to talk of the basework now.


BASEWORK
I decided to do something simple but with great effect. I wanted to achieve small amounts of pigments here and there to create a marsian look of the base. Therefore I used Gravel & Sand Fixer by Ak-Interactive, which you can get at Big Panda V or PK-Pro. A lot of companies have similar products, for example Secret Weapon. Pigments by MIG in this case, but you can find the pigments you prefer from many different companies.


A gentle test on the base with some shy drops of pigments there. 


Using a brush and let a drop of the liquid fall down on top of it, or put close beside.
It will suck in to the pigments and fix 'em.

More pigments now.

After many more pigments and the repeated procedure the base looked like this, still wet from the liquid, but with the pigments fixed. Yay!


FINAL PAINTWORK
The final paintwork included brushwork only. I took care of some more edge highlights and detail lights here and there. Used pigments again on his feet to get back that orange reflection from the base, used an orange/brown glaze at the weapon, added gentle scratches to the armour here and there and went for the final detail lights with pure Ivory, plus did some final work on the prominet face areas and added some fighting wounds to the one and only galaxy defender: Shepard.

For sure I did paint the plinth black as a final step and took proper photos, not from the WIP-table:


If you want to see more angles on the model check Putty&Paint.

CLOSURE
Well, I had my fun finishing this fella up. Here and there I could have spent more time invested in the cleanness of the blendings but frankly, I wanted him to look a little messed up after a fight and enjoyed finished him the way he turned out.

I hope you enjoyed this walk with the Male Galaxy Defender.
Shot questions, ideas or other thoughts via comment if you like!

Keep on happy painting!
Best Wishes
Roman


Banshee again ...

$
0
0
Recently MV linked you to a video from Banshee aka Alfonso Giraldes where he explained some of his painting thoughts and answered questions. Sadly the video turned to full spaniard mode after a little moment and everyone not able to speak spanish was lost in translation...

Now Alfonso wrote us that he did subtitles. Spanish ones when he talks english, english ones when he talks spanish. That is worth to show again we'd say - do not forget to switch on the subtitles in the right corner of the youtube frame ;)


And a little interview that MV captured of him during the Monte San Savino Show 2011 - good memories, loud sunny day and good talk about "Soul in miniatures":

Tutorial Voting: A giant butt in a box that smells like fish?

$
0
0
Heyho Jungle Painters,

time for this week's tutorial voting strikes and
Massive Voodoo's year of the painter is proud to bring you this weeks choices.

You can put a vote via comment to decide which article you want to see up early next week.Voting ends Monday next week!
Bring it on!


#01
In this article Raffa is explaining to you with some cool tips and tricks on how you can sculpt a loincloth on a giant's butt from Games Workshop. It gives insight in tools and material.

For this article vote "Giant butt" in your comment!


#02
A step by step on Roman's latest bust, the Inuit Fisherman. A colourful journey through a truely big bust. Talking about painting the fish, the skin, the leather and doing the snow.

 For this article vote "Inuit Fisherman" in your comment!

 
#03
Some projects need their own transport box and Roman's "Last Light" is definatly one of that kind due its pure size. Find out how Roman build a truely sturdy transport box for this diorama and learn about the material and the steps you need to find and take.

For this article vote"Carry Box" in your comment!

Fresh Paint - Michael Hussar

The Aquila - Hero of Rome 41 A.D.

$
0
0
 
41 A.D.

In the dark lands of the Chauchi Tribe,
deep in the winter forest of Germanica,
a hero of Rome was born as he returned
one of the lost eagle home to mother Rome.


Great model by Nuts Planet
You can find a Miniatures Unpacked with a detailed look on the sculpt here.

A lot of fun for me as I am still reading tons of Ancient Roman novels. My brain, soul and mind is totally stuck in the ancient world. Usually I have such reading phases about a specific topic for some months, but this one now goes on for over eight months now. You can not imagine how many books I have read so far. And even the novels are fiction they are always presented in a historical correct background. There is truely a lot to learn from that big picture. Really my joy since some months.

I decided to give this bust a go to let out some of the impressions I gained from reading all of these books. Sometimes this has to be done. Thank you, Nuts Planet and Benny Sa :)

Last photo shows the bust in my cabinet.
Strange light there as the yellow lamp from above makes it all a bit weird.


The Aquila - Hero of Rome 41 A.D.
Nuts Planet, 1/9


If you want to see more angles of this bust, please feel free to check it in my gallery on Putty&Paint.

You can be aware of a future step by step about this bust. It is in preparation for you already. Interesting might be where this journey started. I really started with fun on it and the early WIP looks even crazy to me as I just was throwing colour on it in pure joy of painting:

Early WIP - after the first hour of colour throwing:


Hope you like him!
Keep on happy painting! 
Best Wishes,
Roman

quote of today

$
0
0
"If you do not change direction, you may end up where you are heading."
                                                                Lao Tzu 


MV's Jar's Basing Class - Review Preview

$
0
0
Augsburg's MV's HQ is still a little exhausted, yet happy as we had a great time on Roman's second and also for this year last Basing Class this past weekend. Thanks to everyone who attented and made the weekend what it was: very cool! We hope everyone had a safe trip home and a good start in the new week ... here are some first impressions:


More soon!

Massive Voodoo's year of the painter 2014

$
0
0

Hi Jungle Painters,

while it is becoming a weekly routine already we want to say some more words about  
MV's year of the painter.

Right now many weeks have passed with weekly Tutorial votings and weekly articles. For us it is great fun to see how far we can reach with our inspiration and our helpful articles, packed with hints and tips about miniature painting. MV's year of the painter helped the jungle's article section to grow to 258 free articles.

We are thankful to all of you who take part in the weekly votings, who spread the word about it and who enjoy what happened so far since the announcement of the year of the painter, back in the end of January with the first tutorial voting.

What happened so far via 
Massive Voodoo's year of the painter?

February 2014
Tutorial: Working with 1:72 Figures, Samurais
Tutorial: Using superglue for structure
Step by Step: The Arkvenger, Pegaso Models
Tutorial: Quick High Elf display base
Step by Step: Zombicide Gaming Miniatures
Tutorial: Stamp your Milliput

March 2014
Step by Step: Quick display figure
Step by Step: Tale of Revenge (by guest author Felix)
Basing Composition: Introduction
Tutorial: How to create bowstrings
Tutorial: Sculpting a Werewolf - part A

April 2014
Tutorial: Never fear your gaming bases
Tutorial: How to find good roots?
Step by Step: The Nightwatch
Tutorial: Building up a Wasteland Display Base
Step by Step: The First One
Step by Step: Pirate Buccaneer
Mu47/Tutorial: Modelmates' Rust Effect

May 2014
Tutorial: How to create Newspapers
Airbrush: Masking Options
Tutorial: How to create stalagmites/stalagtites
Tutorial: Painting the colour "BLACK"
Mu47/Tutorial: Modelmates' Verdigris Effect

June 2014
Step by Step: Dragon Priest
Tutorial: Primitivo Base
Tutorial: How to create candles
Step by Step: Sha'un - Ram Tribe Warrior
Step by Step: What about a quick Slayer?
Tutorial: Curved Plaster Wall Piece

July 2014
Inspiration: Project Motivation
Tutorial: Cleaning your Airbrush
Step by Step:  WHF Chaos Lord
Step by Step: Repainting X-Wing's Imperial Shuttle
Step by Step: Juva, 1883

August 2014
Tutorial: Rider on the Styx
Tutorial: Postapocalyptic Toad King
Step by Step: Drakery's Orc Shaman
Tutorial: 5 colours, 2 hours,1 Mini
 
September 2014
Step by Step: Sha'un Ram Tribe Warrior
Inspiration: Visual Studying - Learning to see
Tutorial: Col. Straken
Mu 60/ Tutorial: Scale75 Metal and Alchemy Steel Series + Inkensity Set
Step by Step - Male Galaxy Defender

October 2014

.....


 More to come this week - stay tuned!


Step by Step: Inuit Fisherman

$
0
0
Atten-shun!!!


Last week's tutorial voting is over and ... it was a lil' FAIL!

The giant butt article is already up to the jungle, we did just forgot about it, but thanks to an anonymous comment we are managed to fail even bigger by posting it up again - here you go:
Link to the giant butt!

We are very sorry about this fact, but hey - nobody is losing anything by this situation as you now see this article again and another one :)

As last weeks voting really was a little mess up in between Roman's preparation for his basing class we are now up to count only the votes for the "Inuit" and the "Carry Box" and the winner from last week is "Inuit".

So let's see what Roman has to tell about his work on this bust by Romain van den Bogeart -
Miniatures Unpacked to it? Here you go!
 ___________________________________________________________________________

FOREWORD
I could do this all day, I could do this all night: Paint and talk about painting. It's in my soul and my heart. Learning always comes slow and a challenge is often welcome. My challenge in this project was definatly the size of this bust and the fish. Honestly I was much looking forward to give this sculpt by Romain my version of colour on it as I do love Romain's sculpts. I touched some sculpts of him in the past and always I had the feeling I could feel the soul he did put in his sculpts. It is always a pleasure to sit down with my muse to paint a sculpt by him as I think or believe that his sculpting and my painting has somehow a connection to eachother.

Big talk here, eh. Well, we are not getting deeper in this little journey of my painting Kong Fu, rather switch over to the step by step article of the "Inuit - Fisherman".


THE PAINTING PROCESS
Starting easy with this article. The resin bust was prepared and glued together. Small gaps have been filled too. I closed the sculpt's eyes as the looked pretty strange at arrival, at least from a painter's perspective. Still interested in the quality of the sculpt and what's up with those eyes? Check the Mu!


I like to go easy in my approach into such a big bust. I went with some brown and skin glazes on top of a pure white primer to just have some colour on the model. And had to threw in some reds to the face. Rough and easy. Sketching.


Now these tones needed a stronger covering power as they were just thin glazes so far. Following you can see the colours I used to achieve this. Mainly working in that brown middle puddle of colour for the face and leather. Still sketching.


After this was dry I threw a wash on all the areas I worked on so far. Army Painter's strong tone is my new love when it comes to this. Still sketching, closing the cavities of the leather and face area quick and rough. Eyes were painted black.


Well, first sketches done on the leather and the skin, now I wanted to start the fish. Fun that I was invited to my girlfriend's dad to have some grilled fish on a sunday, just the day before I decided to start with the fish. Visual Inspiration everywhere.


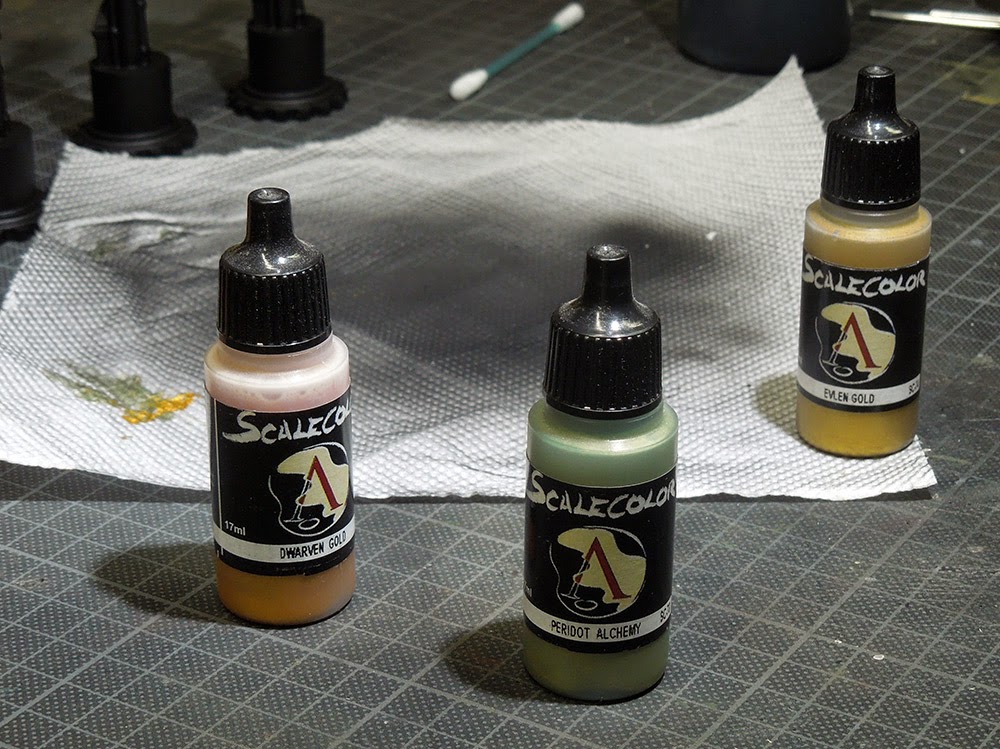
Ok fishy, fishy, here we go. I decided to give it a shiny look and went for a little experiment with one of the Scale75 Metal Alchemy colours. I mixed it in VMC. German Fieldgrey WWII. Painted the whole fishy with it, except the fins and added a little brownish shadow to it. Gentle, but still all is sketching here.


While this was the easy task on that fish my mind was already working further. I was asking my girlfriend's brother and dad as both are really into fishing what sort of fish this might be. No one was really sure so I had to ask back with Romain himself on what sort of fish he was sculpting there.

It turned out to be Dusky Grouper - check Wikipedia here. Now I was collecting inspirational photos to see what was up to be painted there. Using black coloured glazes I started to work on that pattern and also the fins.

The fur on his hood has been painted in some sand tones, including VMC, bleached bone by GW and some London grey mixed in to keep it desaturated for the moment. Sketching. Also used this mix for the bone parts of his jewellry but without the grey in it. Fish eyes sandy yellow basecoat with ... I have no idea which colour that was. Can't tell you the name but I am sure if you look close enough on that photo and search for the same colour in your paint rack without looking on the name, you'll find something really close.


Ok, now I went back again to the Emerald Alchemy Colour. Added some more highlights on the fish's scales to bring out more attention of the fish's volumes. Still sketching, no mistakes can be made here, all areas are in sketching mode.


I did a little too much in my oppinion and went for some strong tone again to apply a wash with. This brings all of the fish together, blends in the recently painted highlights and the pattern.


Next step tp bring all areas up to a same level was taking attention to the leather again. Therefore I used a bright tone and a rough brush to bring on random high contrast leather texture. I also washed the bone jewellry parts with Strong Tone. First highlights on the fish's fins have been done with that greenish highlight tone to the left.


This looks like madness, but when you know were you are heading madness is a positive side effect. I went in for detail scratches now, using a similar bright tone but a more focused brush tip.


Attention to the the scratches in the material and finer texturizing now. More highlights on the fins.


Now the leather got some cure of that madness by using several brownish water thinned glazes on top of it. Including Chocolate Brown by VMC and Strong + Soft Tone washes by Army Painter.


Again I went for the fish's scales with that mix of green and Alchemy colour to set some more scales to focus.


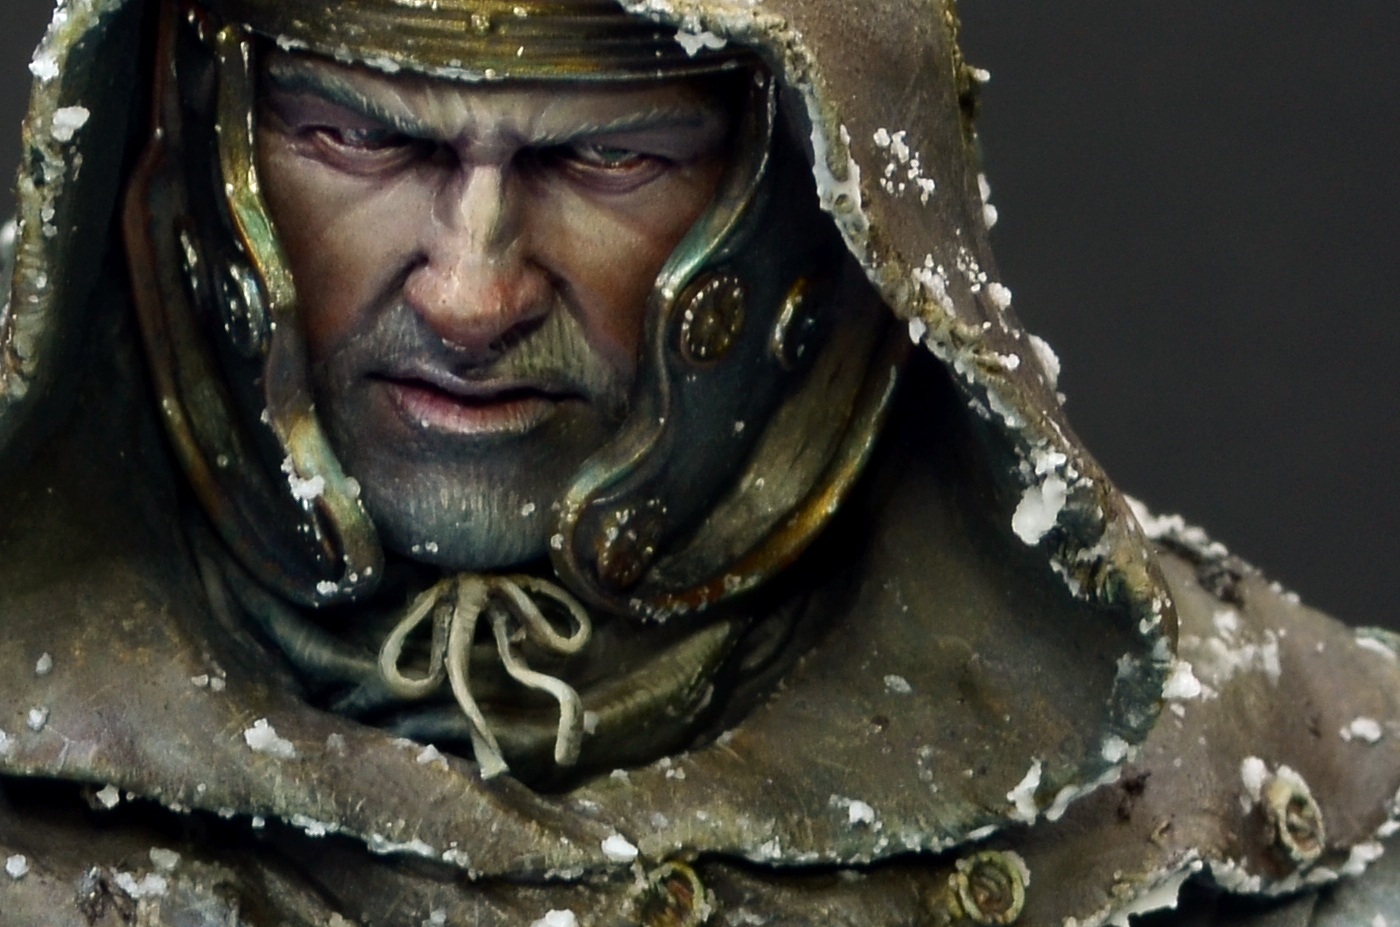
Now I decided to head for the face again. It was also lacking saturation. I used Scale75 Skintone Set for the first time to bring out the prominet face spots on the Inuit's face. Applying my glazes several time to intense them by the number of their applications.

I also used some orange and re-brownish acrylics to be used as glazes on top of the leather parts to bring back saturation here too.

Thanks to Michael from 5th-Dimension I was able to switch the working plinth to a proper plinth, special made for this bust. Thanks, Michael!


While the face was growing in colour power I had my fun with the leather parts by repeating the initial madness of texture and giving it some more glazes of brown, orange, reds and even purple was used here and there.

Pure Ivory was used to clean up the hood fur and bring a light situation on top of the desaturated sketch I have done here in the beginning.

The ropes recieved some highlight colour on top of the darker yellowish brown. Using the application of the brighter tone to place the light situation on top of the darker tone, leaving some spots darker.


As you can see in the upper photo I already started to bring in purple, orange and red glazes to the Inuit's face. Added small details and highlights here and there.


Another long day of painting went by on this bust and I was checking the bust with the camera of my mobile ... well, strange but cool looking photo. I was happy so far but not yet done.


After the photo looked so strange of its colours I decided to take out the big camera and do better photos now to see on the photos were I wanted to improve even more- going on detail hunt - adding my thoughts of plan to improve to the pictures now:

 Overall I was quite happy with the result so far:


Happy with the scales and leather so far, but wanted to bring some more detail on prominent fish scale areas.


Happy with the face, but a little more attention could be done with coloured glazes to make things even more alive. Also some highlights on skin irritations are missing  here. When they are done, I plan to glaze some thin skin tone on top again to blend it all together once more.
I was pretty happy with the rough leather look and the different colours that appeared in it but want to add some well placed edge highlights to the true material damage that can be seen as deeper texture work. For example the cracks here and there are in need of final attention.


The bone jewellry parts need a little more attention and seperation from their sorrounding materials. I will use dark lines to achieve this, sort of dark-lining.


Looking at the fish I wanted to use some gloss varnish on his eyes and on some scale parts, but not all over the place as this would destroy my metal scale look that I have prepared and worked on so far. Happy with the scales but in some areas they are missing highlights in the shadow areas if you get what I mean by looking at the fish's tail in this photo:

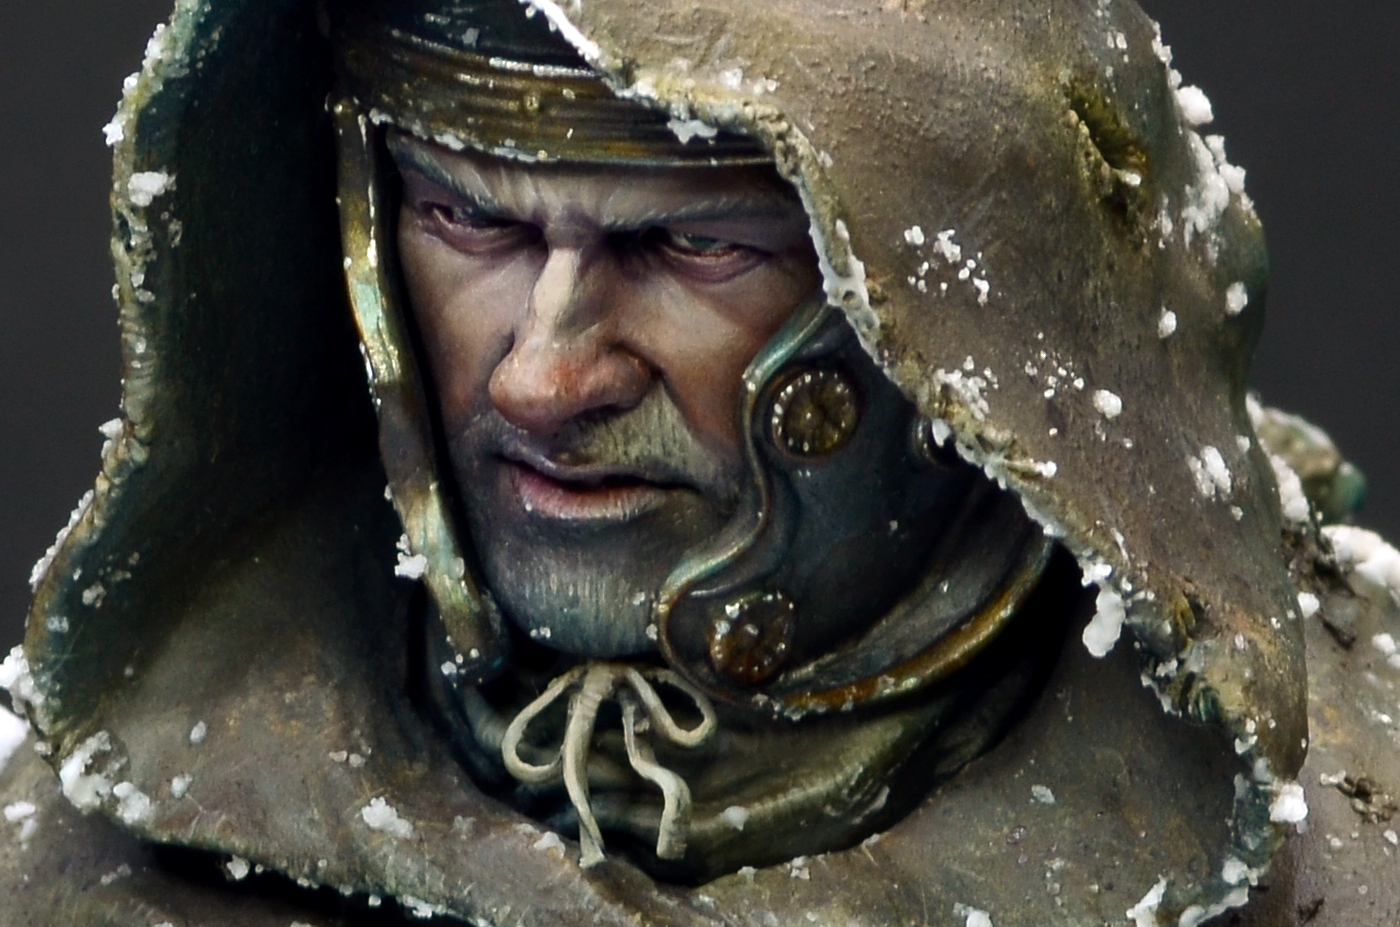
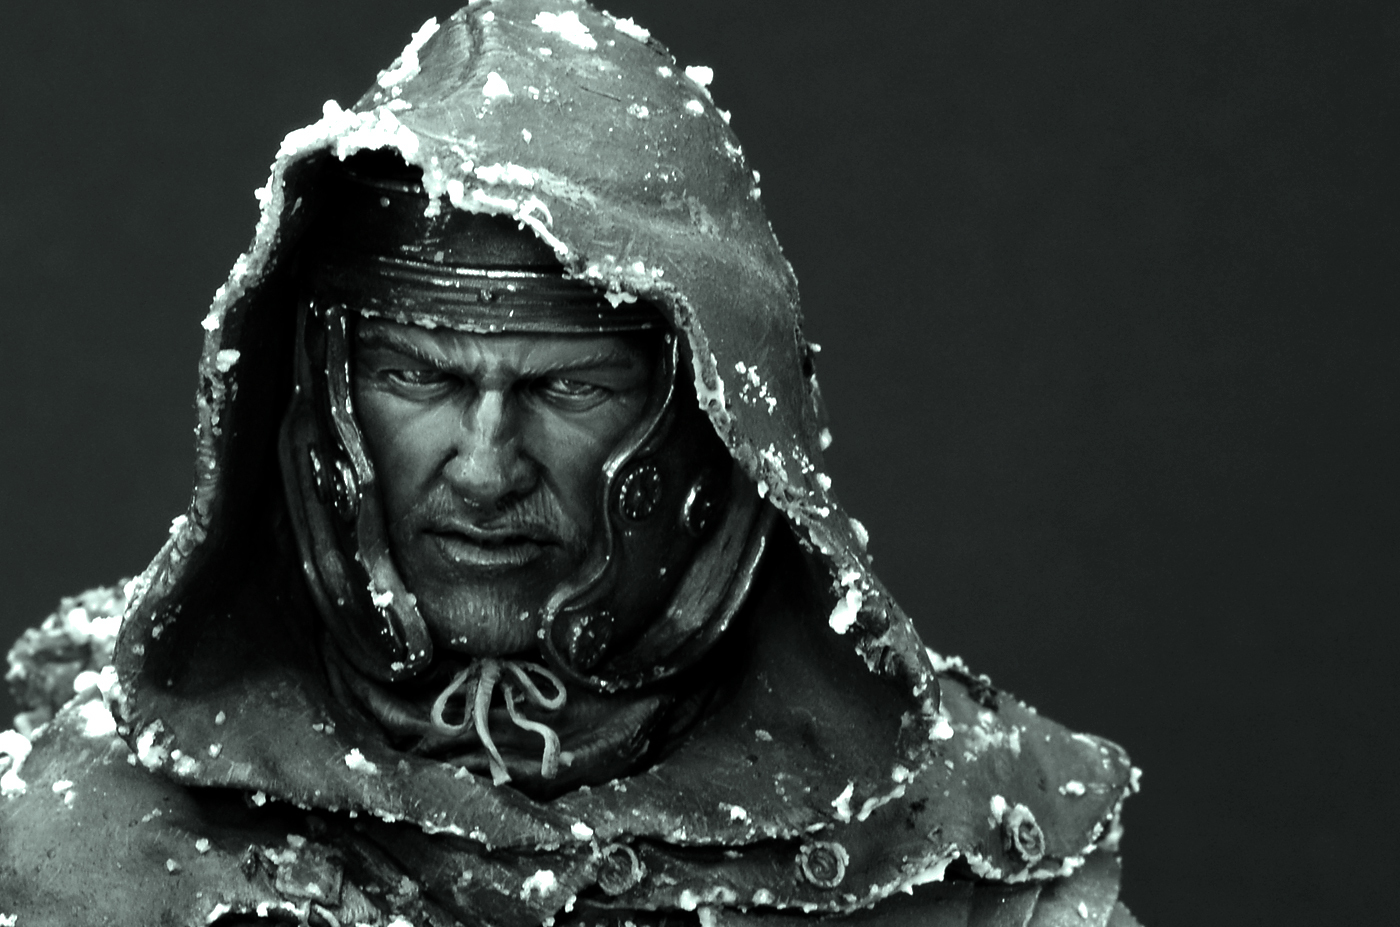
So these are the thoughts I made and wanted to put some more time in. After looking at the bust I also decided to add some snow. A cold breeze that brings some snow the fisherman's body while he is walking home with his catch. I even thought about adding an icicle of snot to his nose but thought this might be way too much.

These in between photos helped me to check back what I still wanted to do and I wrote a list of all of them to see them fullfilled.  So I did in three to four more days of 6~8 hours of painting, before I was able to paint the plinth black and call it done:


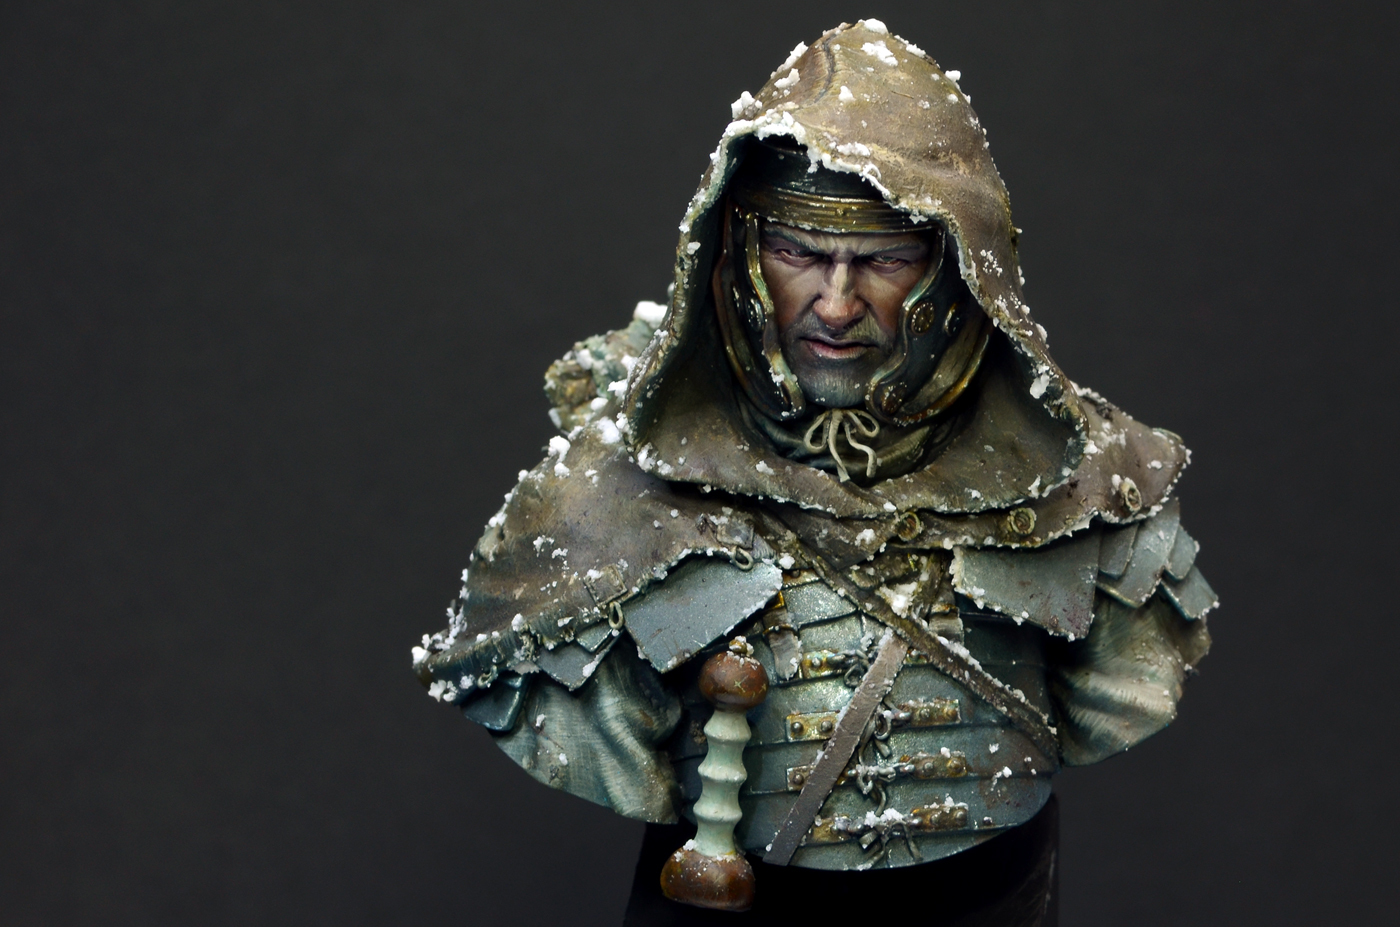
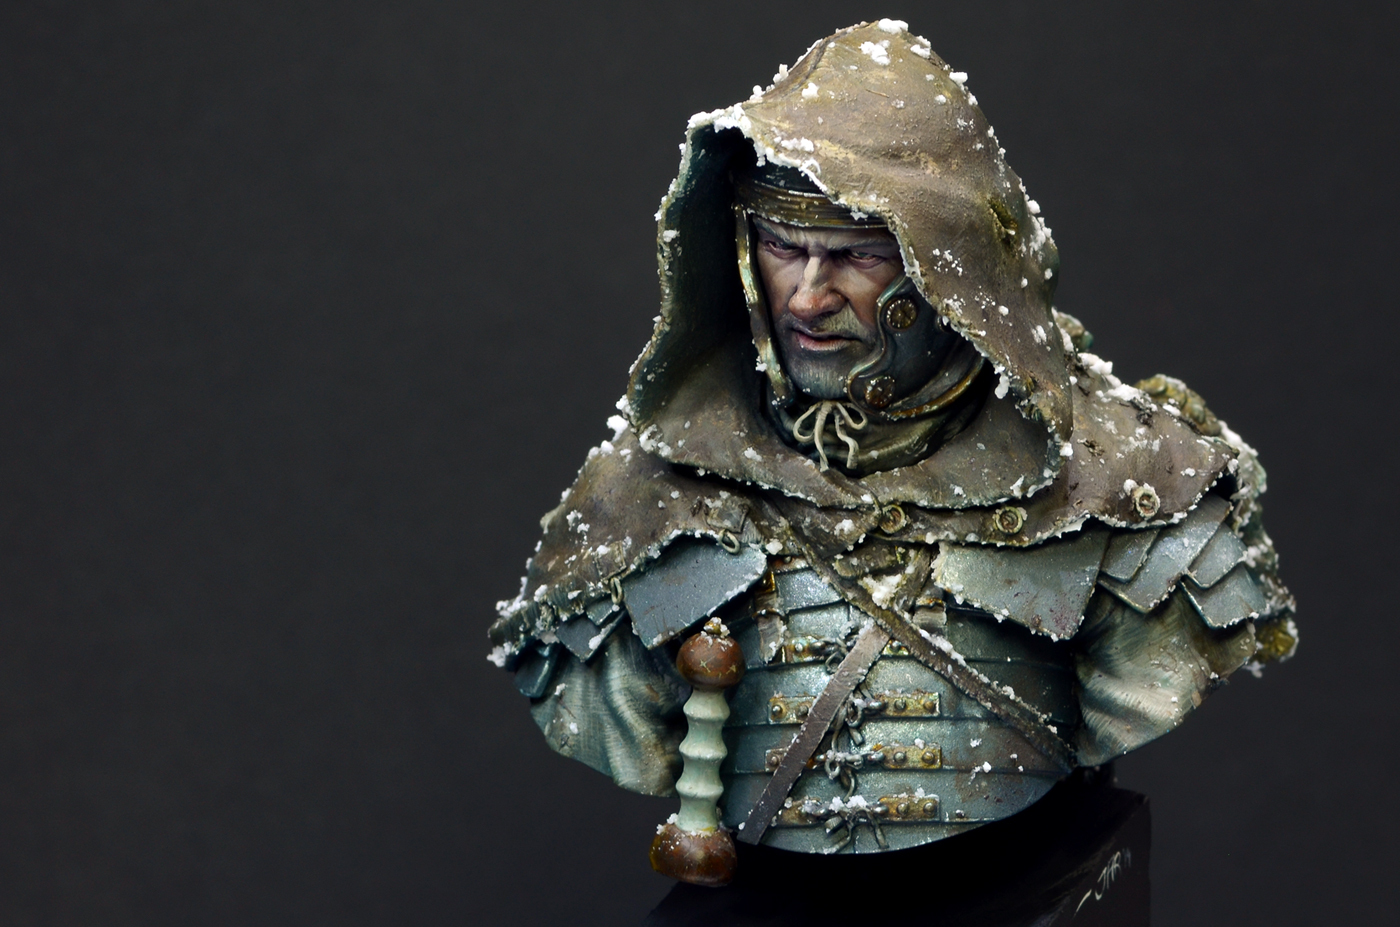
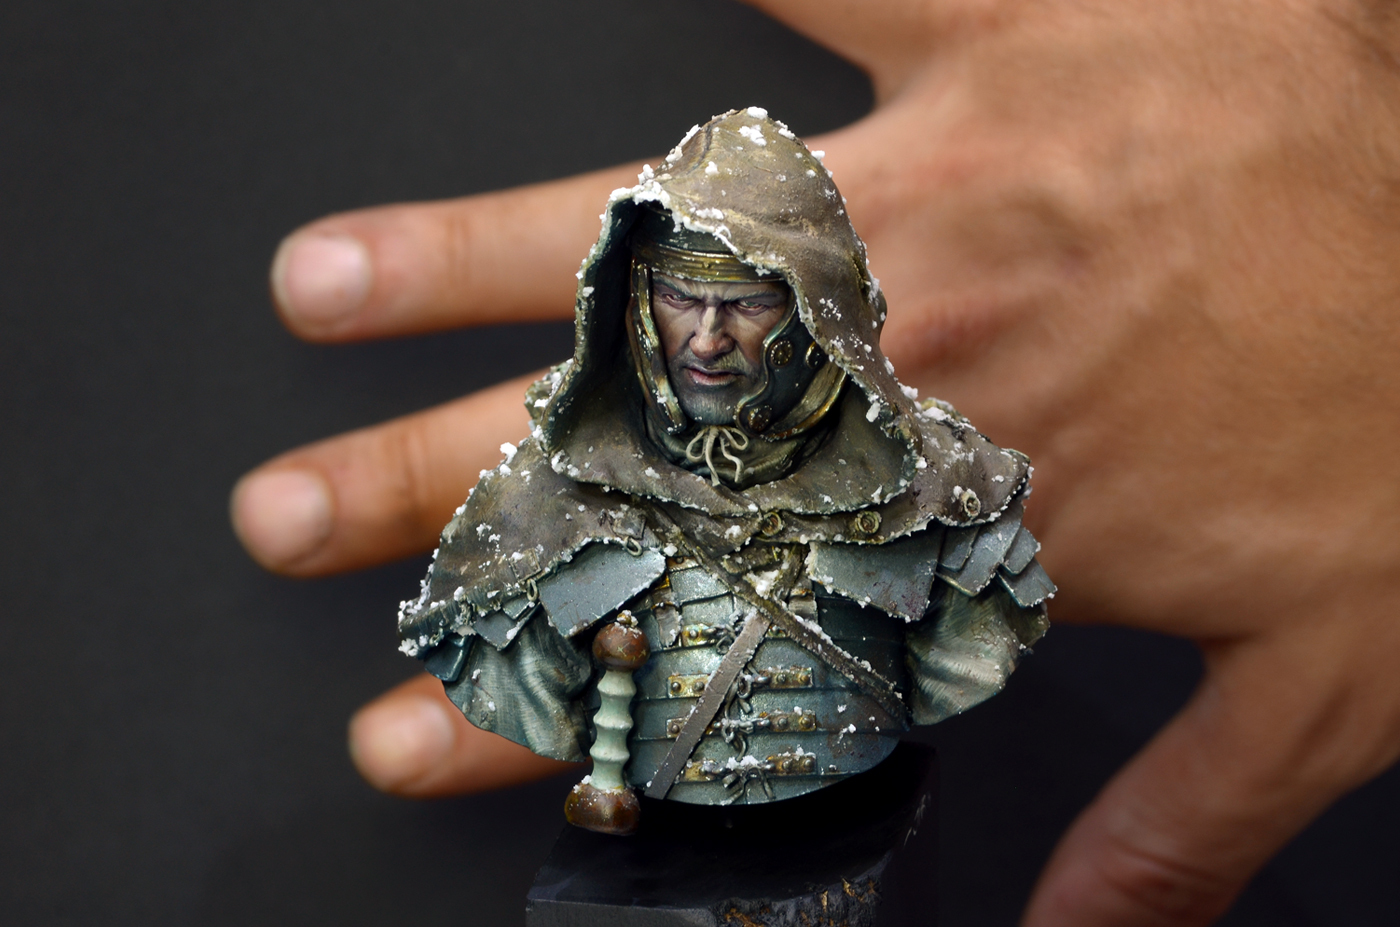
FINAL RESULT
Following you can see the final version I called finished. Well the changes are really subtile, but still took me about three more days to apply them. Maybe only I see them, can be, might be - but I know they are there and that additional time spent on it made it more special to myself. You can click the photos to see big resolution ones:


If you want to see more photos of the Inuit Fisherman check Putty & Paint!

CLOSURE
In hope that you enjoyed this walkthrough article I'll drop out of this write up and make myself ready for your questions if you got some. Let me know your thoughts!

Keep on happy painting!
Best Wishes
Roman


Thanks for the Jungle support! - September

$
0
0


It is unbelievable how fast September went by, eh?

Again Massive Voodoo wants to say big thanks to the Jungle support by donation from the following locations:

08.09.2014 Glen Carbon, USA 10,00 $
10.09.2014 Hammersmith, Great Britian, 20,00 $
28.09.2014 Balwyn, Australia, 10,00 $

With their help we bought a new coffee machine for the Augsburg HQ yesterday as the old one died after too much years in service. The new one is not a fency one, but one that works and delivers coffee! 

Thank you for your support!

Tutorial Voting: A funky Waaagh inside a box!

$
0
0
Good Morning Jungle,

while we face a foggy morning today in Augsburg and can not see our own hands in front of our head Massive Voodoo's year of the painter brings you another tutorial voting - less foggy and without a fail than the last one.

Feel invited to vote your choice via comment. Which article should be up next week?
Voting lasts until Monday next week! These are today's options:

#01
In this article you find a complete walkthrough by Roman on how he proceeded during the Project "Your Waaaghhh! ends here!"from 2012. See inside the plans of the project, the basing and painting execution and some more interesting information.

For this article vote "Waaagghhh!" in the comments!


#02
See Roman tackling his second conversion of Forged Monkey's Jamal bust, called "Funkmaster J".
A little bit of sculpting, chains and glitter in the end. Funky, eh?

For this article vote "Funk" in the comments!
 

#03
Some projects need their own transport box and Roman's "Last Light" is definatly one of that kind due its pure size. Find out how Roman build a truely sturdy transport box for this diorama and learn about the material and the steps you need to find and take.

For this article vote"Carry Box" in your comment!


Private Coaching Review: Matthias

$
0
0


Well, better late than never, eh?
Good Morning Jungle. Today we want to look a litte more back in the past, exactly into this years summer and with some private coaching ahaed we thought it is a good time to review the last private coaching we had with Matthias.

Matthias is pretty busy and we kindly asked him to write some words about his time and his topic in the jungle - it took him a little while, but we are thankful that he did. Maybe he just recieved too much sun during our days in Augsburg.


We know Matthias from a beginner's class in Aachen and he also took part in our first BÄM² in Aachen, so he is no newbie to the way we work and we were really looking forward to see him with the topic we talked about: Basing and getting to know the mighty Airbrush.

From now on we won't lose any more words from our side, but let Matthias tell you what he was up to:

_________________________________________________________________________


"Ok, better late than never, right? 
After finishing university I thought I had earned something for myself and in early June I hit the road south to enter the jungle. Though my orientation skills were not up to the task I wandered a bit through Augsburg without orientation under the merciless sun.

When I finally arrived, a bit late, at the beautiful jungle-oasis, called Massive Voodoo, I first took a sip of water and rested in front of the fan on the sofa. Me regaining some strength we talked a bit about the last details what I would like to achieve during my private practice session. During the last year I always had the feeling that my painting skills are improving but my basing is far off. Though shortly before I ventured to Bavaria the basing Workshop was announced I was too lazy to change the subject or to drive twice to Augsburg and stayed with the basing theme. Getting some inspiration from pictures and the parts available from the stocks and the help of my two apes, I started building the substructure for my base. Though I learned that you should not try to handle a slayer sword and a box full of parts at the same time, the box tends to fall down… 


The idea was that the sorceress summons her minion to defend her dungeon against some foes. So, after finishing the substructure I had to shape a lots and lots of stones. Raffa showed me very well how to shape them and to what I had to tend my attention to. After this, to be honest, tiresome work, it came to give the base some live, adding dirt, candles, the undead minion and other stuff. Here Roman gave me a good insight how to make it not only realistic but also appealing to the eye. Maybe the most important part for me. Finishing my work with some paint from the airbrush I felt pretty satisfied with the result, taking a lot of inspiration, new knowledge and good memories from my days in the jungle. 


So thanks to Roman and Raffa for two fun and inspirational days in their little jungle and for making me feel like home from the first moment on! 

Matthias"

Daddy is a soldier ...

$
0
0
Aloa,

the basing class passed, I catched up with my mails kind of ok and found a little time to regain energies from the cool weekend. I already unpacked all the material from the class, prepare for a beginners class soon in Munich, Germany(still two seats free out of 25) and Massive Voodoo makes ready to head for the Scale Model Challenge in about some days. Busy times, right.

In the last weeks I was also preparing a little exchange miniature for my man Michele from Hamburg as it was planned that he attents to the recent basing class. Well, he got seriously ill and was not able to come. Nonetheless I was able to give it to Heiko from the Wu-Dao to take it with him to Hamburg.

Once in a while when I find the time I do little projects with a nightmare scared tiny girl from Privateer Press for good friends. Often they have been provided with the same model and are told to do an exchange miniature project with me, including the little girl - everything else up to them.
My collection is slowly growing and I am really happy to look at it as I always see the good memories of the friends behind the project.

I did mine for Michele now. 
Beside the scared girl I used two wonderful Hasslefree Miniatures, as both fitted the scene pretty well. The rocking horse is from a product collaberation project I did together with Kellerkind-Miniatures and you soon might find a set of rocking horses available to the public.

I called the project "Daddy is a soldier" and maybe reflect on a radio news I recently listened to where some turkish official said how happy the children are to find a playground after fleeing Syria. I do not want to get into any political statement here, just feel that the project is somehow influanced by the actual world situations. Well, Daddy is a soldier and protecting his girls why they try to find fun in playing on the playground in times of war ...


Daddy is a soldier
Privateer Press, Hasslefree, 28 mm


Nothing too fency but fun to do. I hope you like it!
Keep on happy painting!
Best Wishes
Roman


Viewing all 2385 articles
Browse latest View live